|

Add you Tags
Item specifics
Item
Type: Chandeliers Place of Origin: Guangdong China (Mainland)
Brand Name: other Shade
Type: Crystal Shade Direction: Down Number of Lights: >7 Body Material: Crystal Light Source: LED Bulbs Switch
Type: Knob switch Finish: Polished Steel Certification: CCC,CE,CQC,EMC,UL Style: Modern Is Dimmable: No Voltage: 110V,220V Power Source: AC Is Bulbs Included: Yes
Model Number: other iron: Crystal light: sliver lights: irons Color: Silver Material: Crystal
Type: Contemporary Light Source: Energy Saving
Product Description
Packaging Details Unit
Type: piece
Package Weight: 6.000kg (13.23lb.)
Package Size: 40cm x 35cm x 30cm (15.75in x 13.78in x 11.81in)
Item
Type: Chandeliers Place of Origin: Guangdong China (Mainland)
Brand Name: other Shade
Type: Crystal Shade Direction: Down Number of Lights: >7 Body Material: Crystal Light Source: LED Bulbs Switch
Type: Knob switch Finish: Polished Steel Certification: CCC,CE,CQC,EMC,UL Style: Modern Is Dimmable: No Voltage: 110V,220V Power Source: AC Is Bulbs Included: Yes
Model Number: other iron: Crystal light: sliver lights: irons Color: Silver Material: Crystal
Type: Contemporary Light Source: Energy Saving
Highghts
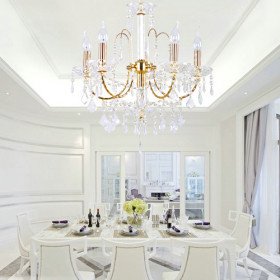
Update your home decor with an elegant chandeer ght>Shining crystal balls are perfect for remodeng and new building projects >Features
All accessories for instalng are packed together with ghts, and it's easy for you to install the ght correctly even if you never install ghts before.>Bulb Base is written as international standard, and you can easily find and buy it in your local stores.>Specific symbols explaination:Φ or D stands for the diameter, H stands for the height.>Tools You Will Need:A ladder >A pair of screwdrivers >A pair of wire cutters >Chandeer Replacement in 7 StepsStep 1: Turn the power offLocate the breaker box. Next, you will need to turn off the power at the breaker box. Be sure to double check that the power is off by turning on and off the ght switch.Step 2: Access Electrical ConnectionsPlace your ladder off to one side of the chandeer. Unscrew the ght canopy to access the electrical connections; there will either be one nut in the middle of the canopy or two screws on each side of the canopy. You may need an extra person to help assist in supporting the weight of the chandeer as only the electrical wires will be supporting your ght fixture.Step 3: Disconnect & Remove the Old Light FixtureRemove the wire nut electrical connectors from the wiring by twisting them counter clockwise. The ground wire may be screwed to the electrical box with a green screw; you will need to remove this. If another person is not assisting you, it will be safer to cut the wires on the ghting side of the wire nuts, lower the ght and then remove the connectors.Step 4: Preparation for New ChandeerNext, you need to prepare to hang the new chandeer. You may begin preparation by reading all of the manufacturer's instructions. The instructions will indicate how to put the chandeer ghting together, if it needs assembled.Step 5: Instalng the New ChandeerNow, you will need to raise the new chandeer and connect the wires. Again, you may need the assistance of an extra person. Make sure to use new wire nuts. You will need to make sure that there are no bare wires showing and that the wire nuts are securely fastened. Remember to re-attach the ground wire screw and ground wire.Step 6: Final ChecksYou will need to tuck the wires into the electrical box and fasten the canopy according to the manufacturer's detailed instructions. You will need to make sure everything is secure.Step 7: Turn the Power OnTurn the power back on at the breaker box and make sure everything is working properly. Now you're ready to clean up and discard your old chandeer.Product Description
Packaging Details Unit
Type: piece
Package Weight: 6.000kg (13.23lb.)
Package Size: 40cm x 35cm x 30cm (15.75in x 13.78in x 11.81in)